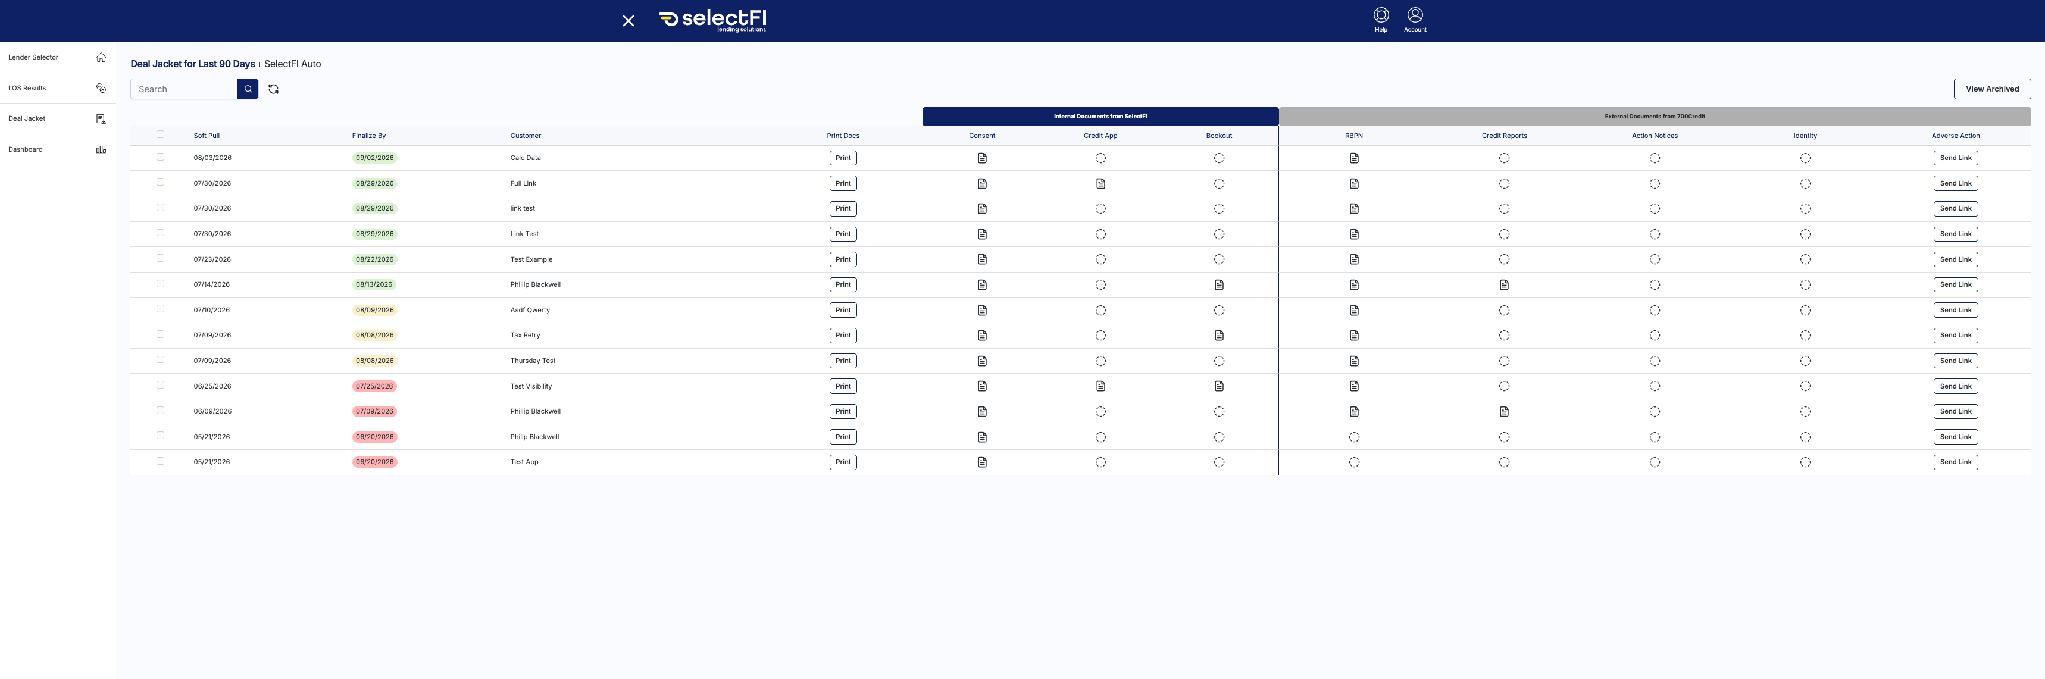
Every deal that runs through SelectFI needs a set of documents to stay compliant with fair lending regulations — things like consent forms, credit reports, and adverse action notices. Instead of tracking these down manually, SelectFI compiles them automatically into a Deal Jacket for each customer, split into two sources:
- Internal Documents from SelectFI — Consent, Credit App, and Bookout
- External Documents from 700Credit — RBPN, Credit Reports, Action Notices, Identity, and Adverse Action
This is what lets your team pull together a complete compliance file for any deal in seconds instead of hunting across systems.
Before You StartFrom the left-hand navigation menu, click Deal Jacket.
You'll land on the Deal Jacket view for the last 90 days, showing every deal for your store.
Step 1: Read the Deal ListEach row represents one customer's deal, with the Soft Pull date, Finalize By date, and Customer name.
|
Tip: The Finalize By date is color-coded by how much time is left — green generally means you're in good shape, yellow means it's approaching, and red means it needs attention now. If you're not sure what the exact cutoffs are, check with your account team. |
Each deal has a row of document icons across the Internal Documents and External Documents columns.
- A filled document icon means that document is available.
- A dotted circle means that document hasn't been generated or received yet.
This lets you see instantly whether a deal's compliance file is complete without opening it.
Step 3: Print or Send DocumentsClick Print in the Print Docs column to print the documents for that deal.
Click Send Link in the Adverse Action column to send the customer a link — useful when a document needs the customer's action, like reviewing an adverse action notice.
|
Tip: If you need to send multiple documents for the same customer, sending the link keeps everything centralized instead of managing separate emails or printouts. |
Use the Search bar to find a specific deal by customer name.
Click the refresh icon next to the Search bar to refresh the list — useful if you're waiting on a new soft pull to come in and don't see it yet.
Use the checkboxes on the left of each row to select one or more deals, then archive them. Click View Archived in the top right to see deals you've archived or that are older than the last 90 days.
Quick Recap- Deal Jacket (left navigation)
- Each row = one deal, with Soft Pull and Finalize By dates
- Filled icon = document available; dotted circle = not yet generated
- Print to print documents; Send Link to send documents needing customer action
- Search to find a deal; refresh icon to check for new soft pulls; checkboxes to archive one or more deals
Questions? Reach out to your SelectFI account team and we'll be happy to help.